The Latitude Learning LMS was designed to adapt to your organization. The standard LMS configuration and LMS add-ons you can select provide a solid learning management platform that can be configured to your organizational training needs.
This six minute video, and the reference guide below, demonstrates how to create and maintain your organization structure in the Latitude Learning LMS. This will help you develop an understanding of using:
- Business Structure to hierarchically organize your learners
- Training Structure to organize your training facilities for courses with a classrroom or virtual classroom delivery type
Overview of the Standard LMS Organizational Structure
New portals are created with the following default Organization and Training hierarchies.
The Business Hierarchy was designed with built-in benefits, including:
- Data security by allowing companies to ‘scope’ (or restrict) areas of access within the organization or learner community (client, partner, internal)
- Flexibility for designing organization-specific needs and business rules (available course and resource catalogs, billing methods, featured courses), as well as flexible assignment of profiles tied to each organization
- Management of your training organization separate from your corporate hierarchy
As shown in the diagram above, the standard organization structure that comes with a new Latitude Learning LMS consists of a Company with one Business Unit (BU), one Division, and one Location in a hierarchy of that same order.
- When using this standard structure, you can add or inactivate BUs, Divisions, and Locations as needed with the following restrictions:
- You must always have at least one active organization at each level in an unbroken chain leading up to the Company level. For instance, at least one active location must be tied to an active division which must be tied to an active BU.
- Never inactivate a BU, Division, or Location if the organizations and/or users below it are active. This orphans the users below the inactive level.
- Never inactivate a BU, Division, or Location that is tied to your primary/default Portal Administrator profile. You will lose your system access.
It is also unnecessary to mirror your company's legal business structure. The organizations in your LMS should be set up to optimally organize your students for the purpose of training and to report on training activities and results.
Company
This is the ‘owning organization’ that holds global element settings, including the following:
- Roles – Roles control system access rights for Students, Location Managers, Location Administrators, Administrators, Instructors, and Portal Administrators, including the options shown on the left navigation menu.
- Positions – Hierarchical position-to-position reporting controls visibility and managerial functions for subordinate position assignments (i.e. “Employees” and “Enroll Others”). Pre-defined positions are provided in the following hierarchy: Training Administrator > Manager > Staff.
- Departments – Grouping of Positions (e.g. Sales or Customer Service). Primarily used for organizing certification or curriculum views under a user’s “Employees” tab.
- User Groups – Ad-Hoc grouping of users across organizations, roles and positions.
- Branding – Includes styling and custom content areas (Home Page and custom left navigation Quick Links menu).
Note: Portal Administrators are typically assigned profiles with the appropriate role/position at the Company level, providing access rights to manage training and users across the entire organization structure.
Business Unit
The Business Unit (BU) is the level at which Resources and Courses are shared for all Divisions and Locations associated with that Business Unit. The parent organization for a BU is the Company. You can create custom course catalogs for each Business Unit by defining the following:
- Courses - Can be assigned to one or more Business Units
- Majors - Allows grouping of courses in the course catalog to aid in course searches; must be associated with the same business unit as the course assigned to the major
- Resources – Supplemental documents or URL links available to learners. They should be associated with the same business unit as the course to which they are attached
Division
A division serves as a reporting level for a grouping of locations beneath it. The parent organization for a Division is the Business Unit.
- Provides users assigned to division-level profiles with visibility and access to users and data scoped to specified Locations under the division without providing access to the entire organization.
- Whether there is one location under it or more, in the standard LMS it is a necessary level to connect users at the location-level to courses and resources at the business unit-level.
Location
This level serves as the base organizational unit for learners. It can represent an organization’s physical location or a virtual location. The parent business organization for a location is the Division and the parent training organization is the Locale. Locations allow you to:
- Establish the Student User Profile assignment and default login location
- Track User transcript activity and report on it
- Set up Featured Courses – Sets of courses being promoted, or featured, at specific Locations
- Set up Payment Methods for tuition – Direct payment, credit card, PayPal active at specific Locations
- Set up Subscriptions – Create and manage course subscriptions by Location
Locales
Training regions, which generally relate to one or more Locations in a Business Structure. The parent Training organization is the Business Unit.
- Manage multiple training regions as needed (e.g. East Coast vs. West Coast)
- Link one or more training facilities to a locale to help coordinate training schedules and classroom reservations.
Facilities
Physical and virtual training facilities used for instructor-led classroom courses
- Rooms – Manage classroom assignments and conflicts during scheduling
- Equipment – Available equipment lists by facility
- Classroom Course Offerings – Time zone tied to location of facility
- Instructor Management – Instructors can be assigned to training facilities they use
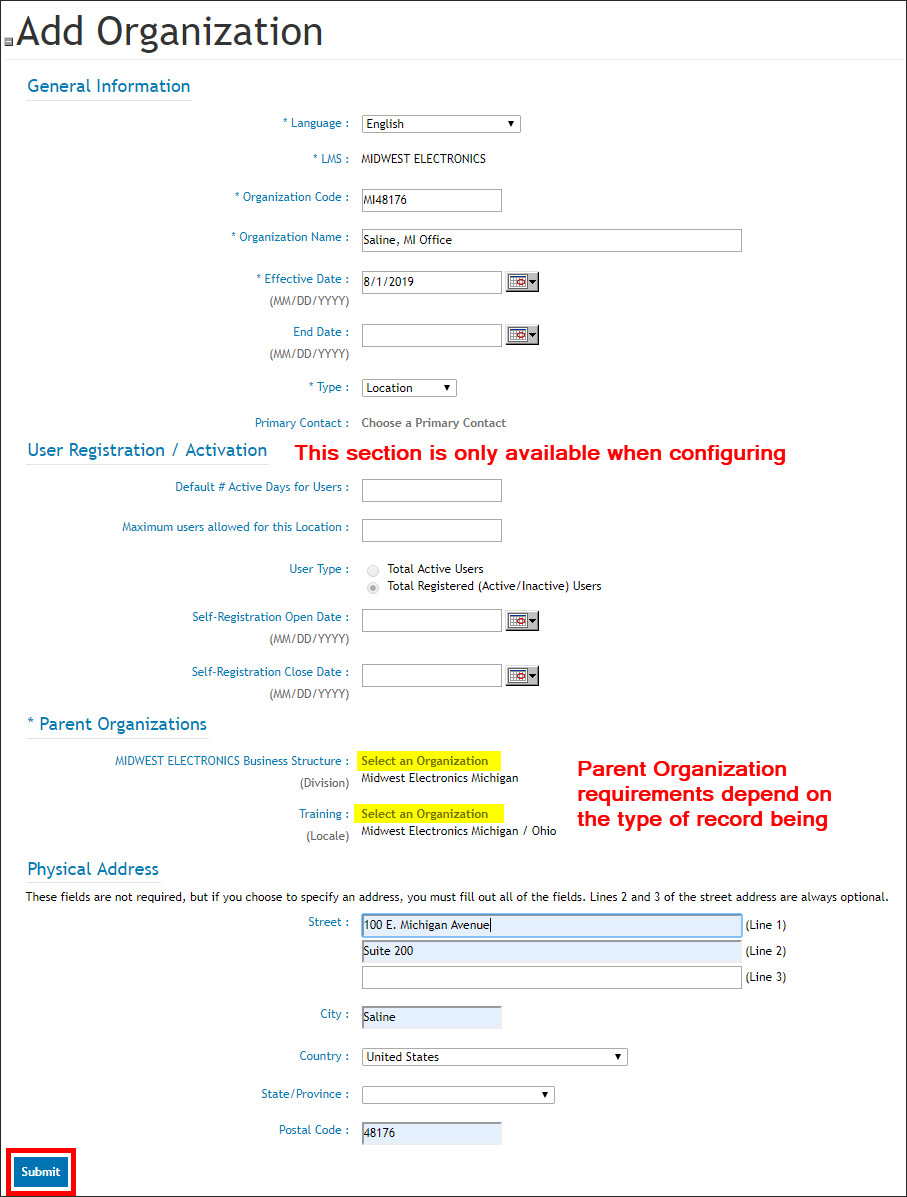
Add an Organization
To add a new organization to any level of the Business or Training Structure:
- Under Organizations in the left navigation menu, select Add Organization.
- On the Add Organization page, enter information as described below.
Note: Field options and requirements may vary based on the selected Organization Type and whether you have purchased any Add-On features for your LMS. All required fields are marked with asterisks (*).

- Language: Select the language in which you are creating the organization.
- Organization Code: Enter a unique code to identify the organization.
- Organization Name: Enter the name of the organization.
- Effective Date: Enter the date on which the organization will be considered Active.
- End Date: To inactivate an organization, enter an end date. This is normally blank when creating a new organization.
- Type: select the new organization’s level from the dropdown list. This will prompt a screen refresh to bring up the appropriate fields.
- Primary Contact: Optionally provide a contact for the organization from among the existing users.
- Section: User Registration/Activation: Only available when adding a new Location. These optional settings allow you to manage the maximum number of users who can be active at a location, how many days they can remain active before being inactivated, and what the effective date range is to allow user self-registration for an LMS account. If no entry is made, then no restriction is placed.
- Section: Parent Organizations: Requirements of this section vary by selected Type. Use the picker provided to select the appropriate parent organization for the new entry. Not all organizations require a Training organization selection.
- Section: Physical Address: Provide a physical address if desired. If you enter any part of the address, you must complete the rest of the form.
-
Click Submit.
Edit an Existing Organization
To edit an existing organization:
- Under Organizations in the left navigation menu, select Search Organizations.
- Use the Organization Picker to search for the organization you would like to update. To return all active organizations in your LMS, leave all search criteria blank and click Search.
- From the search results, find the organization you want to modify. In the Action column, click View/Edit for that entry.
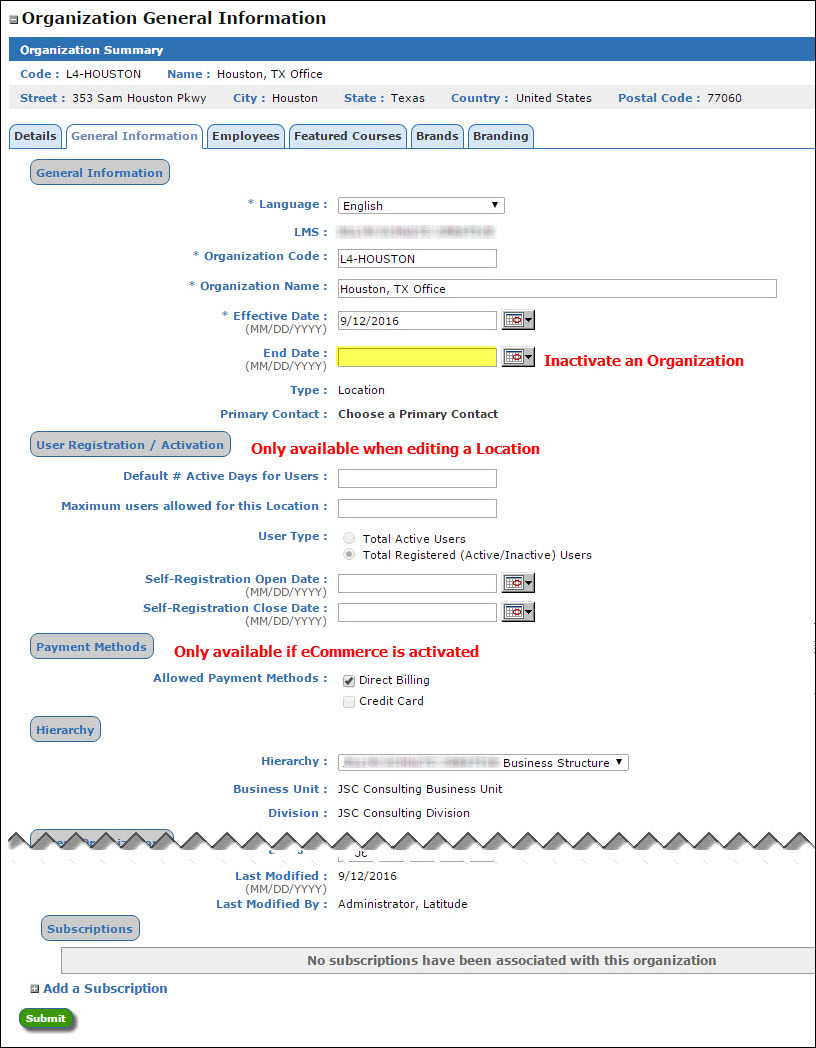
- The Organization Details tab appears in display-only mode. Select one of the tabs described below to view or modify specific settings. Note that options will vary depending on the type of organization you selected and the Add-On functions you may have purchased.

- General Information Tab: Provides access to change the same basic information provided during the creation of the organization and adds the option to select Payment Methods for tuition-based courses. Note: to use Payment Methods, eCommerce must be enabled for your LMS by Latitude Support.
You may also use the End Date field on this tab to inactivate an organization immediately or at a date in the future.
Warning! We do not recommend inactivating an organization without carefully considering the impact on any active users or organizations within or under it. These are just some of the potential issues:
- Loss of course catalog access
- Log in problems
- Inactivation of users in the organization (and below) as well as cancellation of any active enrollments
- Employees Tab: (Locations Only) Displays a list of the employees associated with the specified organization. From this list, a portal administrator can click on an employee’s name to bring up and edit the user’s account information. It is not an impersonation.
- Featured Courses Tab: (Locations Only) Add courses to feature or promote on the home page for users at the selected location. Edit existing featured courses, including the ordinal that controls the order of their appearance on a user’s home page.
- Brands Tab: (Locations Only)
- Branding Tab: (If available) Controls how LMS branding is presented for the selected organization. By default, it inherits branding from the parent organization. If the LMS has the Organization Branding feature enabled on the Site Management>LMS Information page, custom branding may be established for an organization that is different from the parent. This setting can be activated if necessary by request to Support@LatitudeLearning.com.
Analyzing Organizational Structure Issues
- Organization Code Already Exists
If you are warned that the organization you are trying to add already exists, but you cannot find it with a standard search, perform Search Organizations using the Status criterion Inactive or Both. By default, Search Organizations only looks for active records.
- Users experience difficulty logging in or accessing courses:
Although there are many reasons that could cause login or course access issues, as part of your investigation into the cause, always consider these organizational impacts as potential contributors.
- Check to see if there is a Default # Active Days for Users set for a location. If so, the scope of the impact would depend on the number of users activated at the same time. This setting is available when editing a Location record.
- Check to see if the user location or any upper level organizations (e.g. division or business unit) were inactivated. This would affect all users at the inactivated level and in any levels below it in the organizational hierarchy.
|