|
Positions are the default element of the user profile that help define where users fall in the management reporting hierarchy of the organization to which they are assigned. Portal Administrators alone have the ability to create and manage Positions, as well as assign them to LMS user profiles. The relationships between positions, collectively known as the Position Hierarchy, can be defined and managed as needed to best support the training management and reporting requirements of the organization. Positions are globally available and can be assigned to any user profile. Because portal administrators can define superior and subordinate relationships for each position, the position hierarchy drives managerial oversight of user training and reporting, flexing to meet business needs.
IMPORTANT NOTE: The default user reporting hierarchy in the LMS is based on the Position-to-Position Hierarchy. There is alternative user reporting structure called Person-to-Person reporting which must be manually toggled “on” to activate. Even if your organization is enabling the option to use Person-to-Person Reporting, you are still required to establish a Position-to-Position Hierarchy. The Person-to-Person Reporting structure, when enabled, overlays the position hierarchy for many LMS employee management activities. Positions and the position hierarchy remain an important element of other key LMS functions, including Certification and Curriculum Management, regardless of the user management reporting structure you employ in the LMS. See Manage User Reporting Hierarchy: Person-to-Person to learn more about that user reporting hierarchy option.
Considerations for Establishing Positions and the Position Hierarchy
It is important to understand how you want your organization to oversee training and report on training activities prior to setting up your positions or building a position hierarchy. The position hierarchy’s primary purpose is to provide managerial oversight of training for users in subordinate positions and to ensure that managers have visibility of those users through reporting. It also helps ensure that data visibility is scoped to just the level needed, restricting visibility to only those users whose positions are subordinate at the organizational level to which you are assigned.
Keep in mind:
-
The positions can, but are not required to represent the job titles of your organization
-
Not all managerial relationships are concerned with employee training management. When users have a number of direct and dotted-line managers, consider building the hierarchy in the LMS that pertains to just those superiors who are relevant to the training aspect of employee management. Consider which superior position would be the one to:
-
approve a subordinate position’s enrollments, if necessary
-
assign training to the employee
-
get notified of subordinates’ training activities
-
view employee training history via LMS reporting
-
Having a position hierarchy that is too complex with extensive numbers of superiors and/or subordinates per position can have an adverse impact on system performance. It is okay to have more than one superior position, but it should be restricted to those relationships that make sense from the perspective of employee training oversight.
How Positions Support Managerial Users
The LMS uses Position in conjunction with Organization and Role information to support managerial users in several key ways. This section assumes that Position-to-Position reporting is enabled, not Person-to-Person.
-
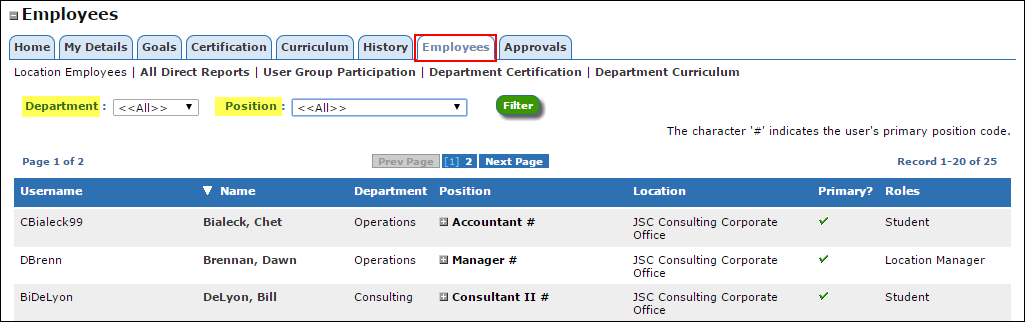
Employees Tab: Users assigned to a position that has subordinates will see this tab on their LMS Home page. It allows a manager to see their employees at their location, all direct reports, employees by user group, and those related to a department certification or curriculum. It can be further filtered by using the dropdown lists for Department or Position.
-
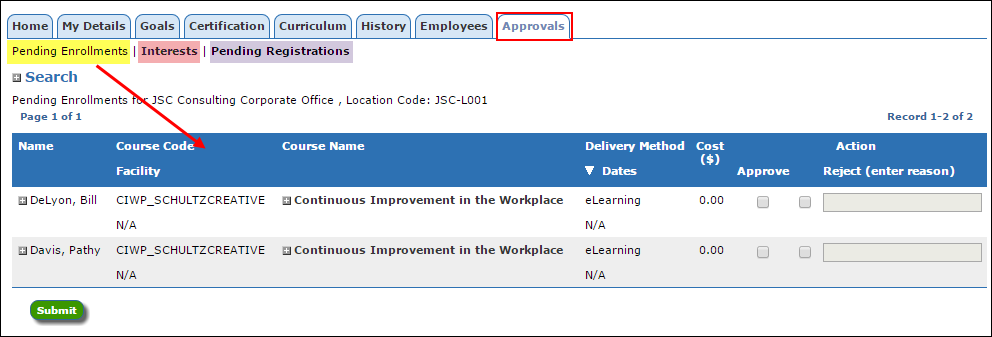
Approvals: There are three types of Approvals -- Enrollment, Course Interest, and Self-Registration. The Approvals tab automatically appears on a user’s Home page if their position is superior to one or more other positions. A manager can view pending approvals by selecting the appropriate approval type link, then approve or deny as needed.
-
Other Impacts of Position
-
Announcements: Portal administrators can use the embedded messaging system to communicate with a targeted set of users based on a wide range of filter options, including their Position assignment. This feature is available on the left navigation menu.
-
Prerequisites/Course Equivalencies: Use position membership as part of an equivalency or prerequisite rule to restrict course access to users in certain positions only.
-
Departments: This is one of two ways to group users by position in the LMS. You can find the Department functionality in the left navigation menu under Organizations. It is designed to mimic functional groups in your organization and can be used by the LMS for sending announcements to specific subsets of users.
-
Position Groups: These are part of the Certification/Curriculum Management feature. Individual Positions that require the same certifications may be organized into groups. Certifications and/or Curriculum requirements can then be assigned to one or more Position Groups, providing automatic assignment of certification/curriculum tracks to all users in a given Position Group.
-
Add Interest: Use position to find a subset of users to mass enroll in a particular course using the Mass Add Interest function. This is found on the left navigation menu under Interests > Add Interest.
-
General Search: Position assignment is often used throughout the LMS when searching and targeting specific users, for example, when using tools to batch enroll others, send announcements, and add interests.
-
Reports: Position, in combination with organization level, contributes to the scoping of report results for a particular user. Managers who can run reports will normally see results only for users in subordinate positions to their own and only at the organizational levels they to which they are assigned.
Add a New Position
Follow these steps to add new positions to your LMS and relate them to superior and/or subordinate positions as necessary.
-
From the left navigation menu, select Organizations > Add Positions.
-
On the Add Position page, make entries as described below. Asterisks [*] on the page indicate a required field.

- Language: Select the language in which the position is being created. The default is English.
- Code: Enter a unique code to represent the position.
- Name: Enter a name to identify the position. Because some LMS displays only show the position name, it is a good practice to make the name meaningful and unique from other position names.
- Effective Date: Enter the date on which the Position will become active.
- End Date: The date on which the Position becomes inactive. This is not normally added during Position creation unless the position has a known end date.
- Superior Positions: Click Select Superior Positions to search for and select one or more positions that are superior to this position. NOTE: Although this is not a required field, in order for portal administrators and others to manage the user, all positions except for the portal administrator should have a superior. The portal administrator should have the top-level position.
- Subordinate Positions: Click Select Subordinate Positions to search for and select one or more positions that are subordinate to this position. Although this is not a required field, in order for portal administrators and others to manage the users throughout the hierarchy, all positions should have a subordinate unless users in the position have no managerial accountability and are truly the end of a particular branch in the position hierarchy.
- Position Group: If the position is going to be assigned Certification or Curriculum goals, click Select a Position Group to search for and select the group to which it belongs.
- Department: If you use departments and the position can be associated with one, click Select a Department to search for and select the one to which it belongs.
- Click Submit.
View/Edit Position
Follow these steps to view or edit a position.
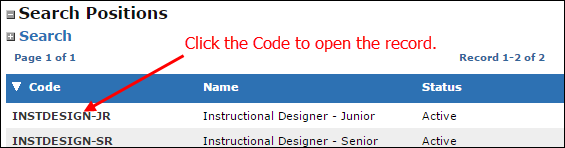
- From the left navigation menu, select Organizations > Search Positions.
- On the Search Positions page, you can filter by Name or Code to find a position or leave the fields blank to view all. By default, only Active records are shown. To view inactive Positions, select Status = Inactive or Both.
- Click Search.
- From the Position search results, click on the specific Position Code link to view or edit that position record.
- The Position Details page breaks out the Position information in three tabs:
- Details: provides display-only information about the position.
- General Information: allows modification of the Code, Name, Effective Date, and End Date of the position.
- Relationships: allows modification of the position’s Superior and Subordinate Position relationships, Position Group assignment, and Department assignment. This establishes the position hierarchy and drives managerial oversight of user training activities and reporting. Users may only view users with subordinate positions at locations for which they have a profile. If users have profiles at upper level organizations (e.g. company, business unit, division), they can see subordinate users in any level associated with that organizational unit, but will not be able to see peers or superiors.

- Click Submit on the General Information or Relationships tabs after making any changes.
|