Every Latitude Learning LMS is set up with one Portal Administrator account by default. User Management features allow Portal Administrators to add, modify and deactivate user accounts within their LMS, giving them control over each user's access to features (through Roles) and managerial reporting status (through Positions) for specified organizations.
A user's master record must include an active account Username at the Account level and at least one active Profile to retain “Active” status. Like all elements within the LMS, accounts and profiles are active when the current date falls within the Effective Date and End Date of the record. These dates may differ between the account and the profile, or even between profiles when an account is set up with multiple profiles.
An inactive user has no active profiles and their master account record is also end-dated, resulting in an “Inactive” user status. Portal administrators may consider deactivating users in order to stay within the limits of their Active User License (the Forever Free LMS allows up to 100 active users). There is no cost for inactive users because they cannot log into the system.
Portal Administrators can review a user’s training history regardless of the user status and in most situations, can reactivate user accounts at any time. They must perform the user search using Status=Inactive in order to find the records.
Review the topics listed below to learn more about managing user accounts and profiles:
- Profile Overview
- Add Multiple Positions or Roles to a Single User Profile
- Add Multiple Profiles to a Single User Account
- Flagging Profiles as Default and Primary
- Deactivate Username and Profile records
- Reactivate Username and Profile Records
- Navigate Between Two or More Active Profiles
- Instructor Profile
All new user accounts are created with the default role “Student” and must be tied to a “Location” level of the organization. This ensures that the user can successfully log in to the LMS, and that authorized portal administrators will be able to impersonate the user during support activities.
Some LMS users will fulfill responsibilities beyond these parameters. The LMS allows for any combination of profile Organization, Role and Position assignments.
From the left navigation menu, administrators can click Users > Search Users to find users throughout the entire organization. Our User Search allows you to build search queries using a variety of criteria and logical expressions. There is no limit on the number of results displayed when using this User Search.
If you know the Username, you can forego the search process by entering it in the Username field. Then click the appropriate button to go directly to a specific portion of the User Details.
- Edit User Account for quick access to the General Info page to manage master data like name, email, password, or address.
- Edit User Profile to manage the user's current Profiles tab entries, which define their roles and scope of access within the LMS. From the Profiles tab, click Edit Profile to modify an existing entry or Add Profile to add a new entry to the list.
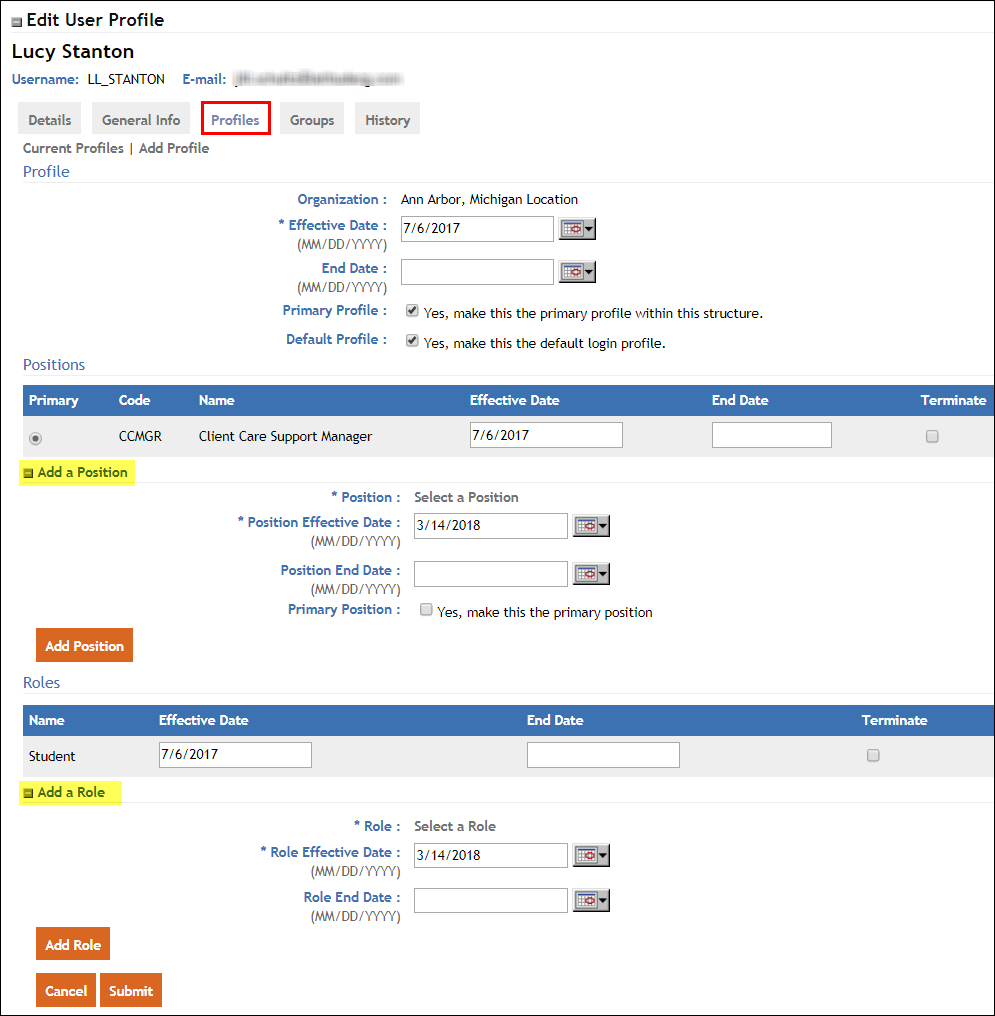
Add Multiple Positions or Roles to a Single User Profile
After new users are set up, manage their profiles on the Edit User page's Profiles tab. Each Profile is tied to only one organization unit (Company, Business Unit, Division or Location) and once saved, this selection may not be altered. At that particular organization profile, a user may have several Role and Position assignments. To add additional roles or positions to a single existing profile:
- From the user's Profiles tab, click Edit Profile under the Action column.
- Add an additional Position by expanding the Add a Position section. Click Select a Position to search for and select the desired addition. Enter the Position Effective Date if other than current date. Check the Primary Position box only if this new position is the user's most important position. To save, click the Add Position button.
- Add an additional Role by expanding the Add a Role section. Click Select a Role to search for and select the desired addition. Enter the Role Effective Date if other than current date. To save, click the Add Role button.
- Click Submit.
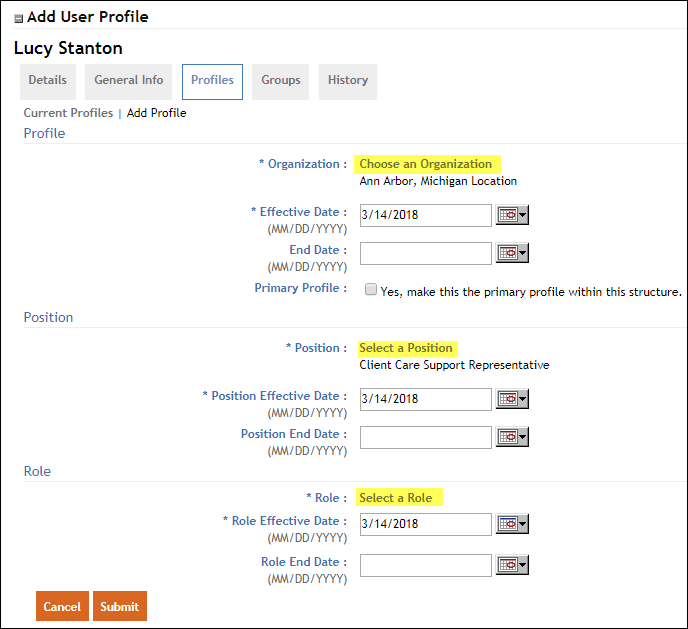
Add Multiple Profiles to a Single User Account
A user can also have multiple Profiles, each tied to a different organizational unit within your structure. These profiles can also have different roles and positions. A user's experience can vary depending on which profile is activated when they log in or when they switch profiles, which will be described later. To add an additional profile:
- From the Profiles tab, click Add Profile.
- On the Add User Profile page, click Choose an Organization to search for and select the organization for the new profile. It can be at any organizational level. Remember that the user will get system features and employee oversight based on the roles and positions assigned at the organization level chosen. Select the Effective Date and if this is to become the user's primary profile, select the Primary Profile check box.
- Click Select a Position to search for and select the user's position at this organization. Select the Effective Date.
- Click Select a Role to search for and select the user's role at this organization. Select the Effective Date.
- Click Submit.
Flagging Profiles as Default and Primary
If a person has multiple Profiles, the Primary and Default profile flags are important settings to make.
- The Default Profile flag determines which location they land on upon login.
- The Primary Profile flag indicates which profile contains the user's primary Organization, Role and Position assignments.
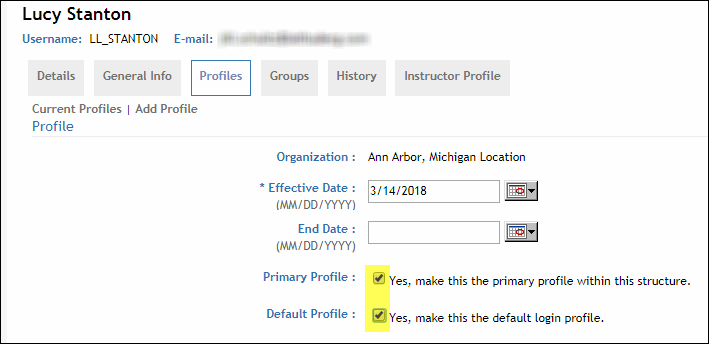
Only profiles tied to Locations can be flagged as "Default". This limitation is important for user management, support and reporting purposes. Any attempt to establish a "Default" profile at any other organization level will result in an error. Users who do not have a Default Profile are prompted to choose a profile upon logging in. Latitude strongly recommends setting a default location profile for all users.
The "Primary" flag is more important. It controls how the LMS tracks user activity (i.e. the information pulled into standard LMS reports) and user functionality with regard to access rights associated with role and position assignments. The Primary Profile flag should also be tied to a Location, but it is not required that it be the same as the default location.
For users who have a single profile with multiple position assignments, there is also a radio button that allows you to indicate a Primary Position within a profile. This setting affects the position-to-position reporting structure. Managers can only see employees who have subordinate positions flagged as Primary.
Note: When searching or impersonating users, the hashtag (#) indicates the organization assigned to a user's primary profile. In the Search Users view pictured below, the "Location Code" column is only displaying this sign next to locations associated with primary user profiles.

INactivate Username and Profile Records
There are two ways to inactivate users and their associated profiles.
Reactivate Username and Profile Records
Portal Administrators can reactivate inactive user accounts and related profiles. From the left navigation menu, select Users > Search Users, locate the user you want to reactivate, and click Edit User Profile. (Tip: If the entire user account is inactive, you will need to search for Status=Inactive or Status=Both in order to find the user.)
To make the selected user active, an administrator must first configure at least one active profile. On the user's Profiles page, edit one of the existing profiles. Remove the End Date for the Organization, for one or more of the listed positions, and one or more of the listed roles.
To help streamline user reactivation, the system also applies the new/null Profile End Date values to the User's master Account record. After successfully activating a user's Profile, always check their Details or General Information tab to confirm complete reactivation.
The user can then log into the LMS with their original username and password, unless you choose to reset the password at the same time.
Navigate Between Two or More Active Profiles
Users, such as portal administrators or managers, who have multiple active profiles may need to toggle between profiles, essentially “switching hats”, as necessary to complete their LMS duties. For example, a portal administrator who wants to make a course "approval required" for one Business Unit (BU) but not for the others, will need to toggle to an active location profile in the BU requiring approval to make the change affect only that organization.
To toggle between your profiles, select the My Details tab from your home page and scroll to the bottom. There you will find a complete list of active profiles, any of which you can enable by clicking the Activate Profile button.
If you have a profile at the Company, Business Unit, or Division levels, you can activate a specific Location that is subordinate to that profile by selecting the location in the field provided. This is particularly useful for Portal Administrators with a Company-level profile when they want to edit Courses, Resources, Majors, and other information that is tied to a Business Unit outside of their own default Business Unit. For instance, the approval requirements on a specific course can vary Business Unit. If a Portal Administrator is logged into "Business Unit A" by default (based on their default location), any change made to that course's approval settings will only apply to Business Unit A. To change the course's approval setting in "Business Unit B", the portal administrator must activate a profile in Business Unit B by entering a location related to Business Unit B in the Company profile activation field.
To return to your default profile, click RETURN TO DEFAULT PROFILE in the upper right corner of the window.
Instructor Profile
LMS users who teach instructor-led courses should be assigned the Instructor role. This Role allows them to manage course enrollments, classroom offerings, training facilities and more.
An instructor’s User Details page includes an additional “Instructor Profile” tab, where he or she can provide instructional language, qualification and availability information. This profile also indicates which Courses they are qualified to teach and which Facilities they use. Click Schedule at the top of the page to view the Training Calendar, which shows currently scheduled classroom course offerings.

reactivate
-
Manually Inactivate Users
To inactivate an entire user account, from the left navigation menu, select Users => Search Users and locate the account you wish to edit. On the “General Info” tab of the User Details page, click the + symbol next to “Additional Information” to expand the page. In the “End Date” field, enter the day on which you want the user account expire, and then click Save User at the bottom of the page.

You can also create, inactivate and reactivate separate profiles under an active user account. From the User Details page, click the “Profiles” tab and click Edit Profile to modify an existing profile, or click Add Profile to create a new one. As shown below, individual profiles can also be end-dated on this page.
- Use the "Quick Profile Update" Tool
The Quick Profile Update tool allows administrators to quickly create new Primary Profiles for existing users, while automatically inactivating the user’s existing Profile. From one page, you can select updated Location, Position and Role assignments from drop down lists, replacing the manual process described above. Contact the ClientCare team at support@latitudelearning.com to learn more about activating this portal option.
Important Note about the Impact of Inactivating User Accounts and Profiles
- Effect on Open Enrollments related to the End-dated Profile: The system is designed to terminate all open enrollments tied to the end-dated user profile. The LMS design assumes that when a user changes organizations, it is possible that their training requirements and managers could also change. The courses they are enrolled in may not even be available in the new organization. Therefore, all courses in which the user was enrolled, but had not completed, prior to profile inactivation will be canceled automatically, allowing the student to start at the new organization with a clean slate. This automated process does not affect training history, which is retained indefinitely and is visible on the user's History page.
- Be aware of entering correct and logical dates when inactivating accounts and profiles: In some situations, entering account end dates that do not make sense with the effective dates of the user's profile, can cause the deletion of the user account or the user's profile. For instance, entering an account-level end date that comes before the user's profile effective date will delete that "future-dated" profile because the user was inactivated before the profile could ever become active. There is no confirmation message prior to these deletions occurring.
- Data Recovery: Loss of user account or profile information due to data entry errors or situations noted above and subsequent requests to cleanup or restore data are not covered under Latitude's software assurance program. Such requests are subject to a customer's operational services support agreement with Latitude and will be scoped and estimated upon request to Support@LatitudeLearning.com.
- Add Profile – Create new organization, position, and role responsibilities.
- Edit Profile – Reactivate previous assignments by removing the Profile End Date or extending it into the future. When you remove a Profile End Date, the system will automatically check for matching end dates on associated Position and Role assignments, and delete those as well.
- Click Submit.
- If you remove the end date on a profile, the LMS will automatically remove the master account end date.
- If you extend the end date on a profile, the LMS will automatically extend the master account end date.